Author: Dan Kinsella

  • Using an Azure Function as an OAuth 2.0 redirect url

    Using an Azure Function as an OAuth 2.0 redirect url

    We’ve got some great development tools these days in Business Central but it’s still not possible to solve every problem with AL. This week I hit such a problem while developing a Javascript Control Addin to embed a third-party web application in Business Central SaaS. The problem was OAuth 2.0 authentication, or more specifically how to get an access token from a redirect URL.

    The third party web application required OAuth 2.0 implicit flow, for my use this was going to look something like this:

    OAuth 2.0 Implicit flow

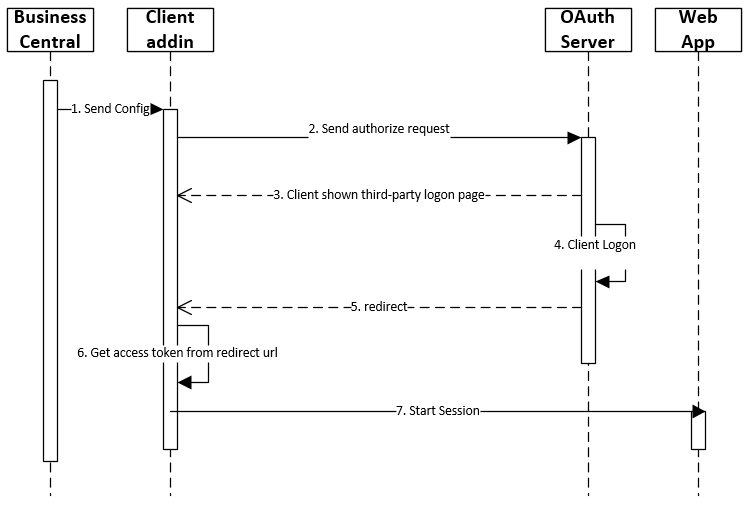
    This is a slight simplification as we only need to authorize if our previously obtained token has expired, but this is not really the point of this blog post.. My problem was 5. redirect; this is a url the authentication server will redirect our users’ browser to (in this case the src of the iFrame used by the Control Addin). The data we need is in the url generated by the authentication server which will need to be stripped off (6) and used in following interactions with the third-party web app.:

    GET $base_url/api/oauth2/authorize?client_id=$client_id&response_type=token&redirect_uri=$redirect_uri
    
    ==>
    
    Location: $redirect_uri#expires_in=3600&token_type=Bearer&scope=$scope&access_token=$token

    So how do we handle this requirement in Business Central? The authentication server needs a URL ($redirect_uri) from us which it will use to send the access data after the user has logged in. This redirect service will then need to redirect the user back to our application. Well the answer is we can’t. There is no way for us to create a web service in Business Central that will handle such a request. We need to build a service to accept an HTTP GET request and extract the query parameters to use in our application (technically the parameters after the redirect url are not query parameters; note the use of # rather than ?.. more on this later), and then load the web app we want to authenticate with into our Control Addin iFrame.

    Using an Azure Function as an OAuth 2.0 redirect url

    The great news is Microsoft has an offering (which I’ve been trying to find an excuse to use for some time!) called Azure Functions. Azure Functions allow you to quickly (and cheaply) deploy functions as web services to be used by other applications.

    I needed an Azure Function, that when called would send the data (hash property) in the url to my Control Addin:

    Azure Function as redirect url

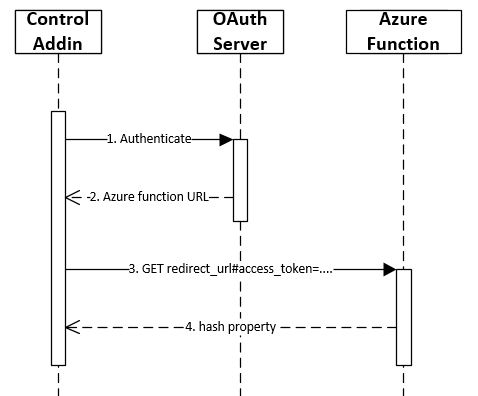
    1. The iFrame src is set to the OAuth authentication url, and the user logs in with their credentials.
    2. On success, the authentication server will redirect to our Azure Function url with the access details in the url hash property.
    3. The Azure function will load in the Control Addin iFrame.
    4. The Azure Function sends the hash property back to our application
    5. Decode the hash property to extract the access token

    Hash Property vs. Query Parameters

    I made the distinction earlier, that what we’re trying to extract from the redirect url is not query parameters, but the location hash property. This distinction is important because it affects how the data is retrieved by our Azure Function.

    $redirect_uri#expires_in=3600&token_type=Bearer&scope=$scope&access_token=$token

    A hash property in a url starts with a # character, whilst query parameters follow a ? character. The fundamental difference is that the hash property is only available to the browser and is not sent to the web server. This means that we’ll need to use client side scripting to retrieve the data.

    Note: OAuth 2.0 does not always send data using a hash property, it depends on the flow you’re implementing.

    Implementing the Azure Function

    The Azure function is incredibly simple, all we are doing is receiving a request and sending the hash property to the Control Addin. I used a node.js based function, simply because I was already using Javascript and AL for this project and didn’t feel the need to add a third language 🙂

    Step 1 – get the hash property:

    let hashString = window.location.hash;

    Step 2 – send the hash property to the Control Addin for processing:

    This takes a little more thought. You may be tempted down the lines of sending the hash value back to Business Central via a web service. Definitely do-able.. but as our Azure function is running inside the iFrame in our Control Addin we can simply use client-side window messaging to post the value back to our main window for processing:

    window.parent.postMessage(msg, "*");

    The above Javascript code is posting a message to the parent window, which will be our Control Addin. 

    The receiving window will need to know what the message is in order to process it. I create the msg variable as a Javascript object, so I can pass through some additional information:

    let msg = {
    type: "xp.authentication",
    hash: hashString
    };

    My message now has a type value and a hash value which I’ll be able to pick up in my Control Addin code. 

    Of course this is client-side Javascript (remember the hash property is only available to the browser), and will need to run inside the iFrame when the Azure Function is invoked. This means our Azure Function will need to return this code for the browser to execute. I did this by creating a simple HTML document as a string and passing it back as the response body. The full Azure Function code looks like this:

    module.exports = async function (context, req) {
    const responseMessage = '<html><script>' +
    'let hashString = window.location.hash;' +
    'let msg = {' +
    'type : "xp.authentication", ' +
    'hash : hashString ' +
    '}; ' +
    'window.parent.postMessage(msg, "*"); ' +
    '</script>' +
    '<h1>Getting access token...</h1></html>';
    context.res = {
    headers: { 'Content-Type': 'text/html' },
    body: responseMessage
    };
    }

    Retrieving the hash in the Control Addin

    The final part of the jigsaw is to pick up the message sent by the Azure Function. This is done using browser events.

    Within our Control Addin code we can add an event listener to a message event as follows:

    window.addEventListener("message", function (pEvent) {
       if (pEvent.source !== iFrame.contentWindow)
           return;

       handleMessage(pEvent.data);
    });

    The above code will use an anonymous function as an event listener to the message event. I’m using message events to communicate with the third-party web app as well so the above code send all message event data that has come from our Control Addin iFrame to my handleMessage function:

    function handleMessage(pMessage) {
       //redirect token received?
       if (pMessage.type === "xp.authentication") {
           decodeAuthHash(pMessage.hash);
           iFrame.src = 'https://the-url-of-third-party-app.com';
       }
    // ... more event "types" picked up here
    }

    Now you can see why it was important to give the msg variable a type in my Azure Function. If I find the message is of type xp.authentication then I will try and process the accompanying hash property using the decodeAuthHash() function. I’m then switching the iFrame src to the third-party application url specific to my solution.

    From here we can extract the required fields out of the hash string for use in our application. I like to create a JSON object to hold the data as it’s convenient format to use:

    function decodeAuthHash(authHash) {
       if (authHash === '' || authHash === undefined) {
           return;
       }

       authHash = authHash.replace('#', '');
       let hashPairs = authHash.split('&');
       const hashJson = JSON.parse('{}');
       hashPairs.forEach(function (hashPair) {
           let splitPair = hashPair.split('=');
           hashJson[splitPair[0]] = splitPair[1];
       });
       tAccessToken = hashJson;
    }

    I’m assigning the JSON variable to a global variable tAccessToken to use in further functions. I can then retrieve the access_token as follows:

    let accessToken = tAccessToken.access_token;

    See what I mean about JSON being a convenient format in Javascript? You can use it like any other object with properties, no need to find the key and get the value as a JsonToken like we do in AL.. the code is much cleaner. That said, I’m no Javascript expert so please let me know if you have a more elegant solution! 

    That’s it, thanks for reading.

  • How-to stop auto-login to Business Central On-prem with Windows Auth

    authentication

    Probably quite an unusual scenario.. so I’ll explain why it came up!

    A retail customer using LS Central wants to use their POS machine for both POS and back office functionality.

    The complication is; the POS (Web Client) needs to automatically login with the POS Windows account (the signed in Windows account) but for back office tasks they want the user to log in with their own AD accounts.

    The first thing that comes to mind is NavUserPassword for the BO users right? Well, the users are setup in AD so makes sense to use this rather than adding extra overhead of maintaining users/passwords in two places, plus they already have infrastructure in place using Windows auth. UserName auth? Sounds like it should work but again will require additional BC service and as the POS machine is on the domain and we’re using the Web Client it doesn’t really fit the brief:

    UserName – With this setting, the user is prompted for username/password credentials when they access Business Central. These credentials are then validated against Windows authentication by Business Central Server. There must already be a corresponding user in Windows. Security certificates are required to protect the passing of credentials across a wide-area network. Typically, this setting should be used when the Business Central Server computer is part of an authenticating Active Directory domain, but the computer where the Dynamics NAV Client connected to Business Central is installed is not part of the domain.


    So anyway, to cut a long story short you can disable passthrough Windows authentication in Chromium based web browsers (Chrome and Edge) by emptying the authentication server whitelist. This is done by adding a command line switch: –auth-server-whitelist=”_”

    In this case this meant creating a new button called Backoffice in LS Start to open Chrome and adding the –auth-server-whitelist switch to the parameter list along with the BC url.

    disable auto logon
    Of course, you can also add this command line switch to a Windows shortcut:

    auth server whitelist

    You’ll notice this will disable passthrough authentication for the open browser window, the problem is if you open another link in Chrome/Edge by default it will open it in the same window. To get around this we’ll need to add another command line switch to force Chrome/Edge to open this link in its own window: –new-window

    If you want to learn more about Chromium command line switches, have a browse over here: List of Chromium Command Line Switches « Peter Beverloo

    Job done.

  • Uninstall all dependant apps in Business Central On-premise

    Uninstall all dependent apps

    Ever tried to uninstall a Business Central app in PowerShell, and failed due to dependencies on that app? I hit that problem and decided to share a script to detect and uninstall all dependant apps.

    I was looking to publish an app from VS Code on a copy of a customers database so I could debug and develop locally and needed to uninstall the app first before I could deploy. The problem was, this app was a dependency for several other apps created for the customer.

    What I found is we can get a full list of apps installed with the Get-NavAppInfo cmdlet, then for each app iterate through the dependencies until we find our app:

    https://gist.github.com/DanKinsella/b3b4a534fe23204c35affc56b296d3c2.js

    The script prints out a list of app names and versions which can be used for reinstalling them after. 

    Hope this is useful for someone else.

  • Developing with the new enhanced email feature

    Enhanced Email Feature

    Yesterday, I had an email notification about a new blog post from my colleague Josh Anglesea. A great post on the new enhanced email feature coming with Business Central v17. Out of pure coincidence, I happened to be looking into the same functionality, but from a development perspective… So inspired by Josh here’s a blog post about developing with the new enhanced email feature.

    Josh already did a great job explaining how to setup the new functionality, so I highly recommend you read his post before continuing as I won’t go into this.

    The major change this new enhanced email functionality offers is the ability to configure multiple email accounts and have Business Central select the correct account based on the scenario. This is in contrast to the single account you can configure per Business Central company using the old SMTP Setup page.

    This brings us to the first new concept: Email Scenario

    When you create a new email account, you can choose which scenarios this account will be used in. The scenarios offered by the base application are defined in an enumextension object, which extends the systems app’s Email Scenario Enum:

    enumextension 8891 "Base Email Scenario" extends "Email Scenario"
    {
       value(1; "Invite External Accountant")
       {
           Caption = 'Invite External Accountant';
       }
       value(2; "Notification")
       {
           Caption = 'Notification';
       }
       value(3; "Job Planning Line Calendar")
       {
           Caption = 'Job Planning Line Calendar';
        }

        // Document usage

        // ------------------------------------------------------------------------------------------------

       value(100; "Sales Quote")
       {
           Caption = 'Sales Quote';
       }
       value(101; "Sales Order")
       {
           Caption = 'Sales Order';
       }
       value(102; "Sales Invoice")
       {
           Caption = 'Sales Invoice';
       }
       value(103; "Sales Credit Memo")
       {
           Caption = 'Sales Credit Memo';
       }
       value(105; "Purchase Quote")
       {
           Caption = 'Purchase Quote';
       }
       value(106; "Purchase Order")
       {
           Caption = 'Purchase Order';
       }
       value(115; "Reminder")
       {
           Caption = 'Reminder';
       }
       value(116; "Finance Charge")
       {
           Caption = 'Finance Charge';
       }
       value(129; "Service Quote")
       {
           Caption = 'Service Quote';
       }
       value(130; "Service Order")
       {
           Caption = 'Service Order';
       }
       value(131; "Service Invoice")
       {
           Caption = 'Service Invoice';
       }
       value(132; "Service Credit Memo")
       {
           Caption = 'Service Credit Memo';
       }
       value(184; "Posted Vendor Remittance")
       {
           Caption = 'Posted Vendor Remittance';
       }
       value(185; "Customer Statement")
       {
           Caption = 'Customer Statement';
       }
       value(186; "Vendor Remittance")
       {
           Caption = 'Vendor Remittance';
       }
    }


    Building your own functionality on top of this, you’ll probably want to add to the list of scenarios. Good news! This is as simple as extending the Email Scenario Enum in our own apps:

    enumextension 50100 "Dan Test Email Scenario DDK" extends "Email Scenario"
    {
       value(50100; "Dan Test 1 DDK")
       {
           Caption = 'Dan Test 1';
       }
       value(50101; "Dan Test 2 DDK")
       {
           Caption = 'Dan Test 2';
       }
    }


    Once you’ve created your enumextension, the new options are automatically included in the Email Scenario list:

    Email Scenario

    Next up, we need to create an email message and send. This is done using the Email Message and Email Codeunits.

    Note: The enhanced email app is part of the system app, so you won’t be able to see the source code from VS Code, or by extracting the base application app file. The system application apps are open source and available on GitHub to view and submit your own changes, the email app can be found here: https://github.com/microsoft/ALAppExtensions/tree/master/Modules/System/Email


    The following example show how you can create an email message and send using the email scenario functionality:

        procedure SendEmail()
       var
           Email: Codeunit Email;
           EmailMessage: Codeunit "Email Message";
       begin
           EmailMessage.Create('dan@dankinsella.blog', 'My Subject', 'My message body text');
           Email.Send(EmailMessage, Enum::"Email Scenario"::"Dan Test 1 DDK");
        end;

    As you can see, we can pass the email scenario into the send procedure. If an account is associated with this scenario it will be selected for use. If no account is assigned to this scenario the default account will be used.

    Note the Email.Send() procedure is overloaded, meaning it can take different sets of parameters, so have a look at the object here for all the available options.

    Some other cool stuff to check out:

    You can open the new email editor using Email.OpenInEditor() to allow your users to edit the email before sending:

     /// <summary>
    /// Opens an email message in "Email Editor" page.
    /// </summary>
    /// <param name="EmailMessage">The email message to use as payload.</param>
    /// <param name="EmailScenario">The scenario to use in order to determine the email account to use on the page.</param>
    procedure OpenInEditor(EmailMessage: Codeunit "Email Message"; EmailScenario: Enum "Email Scenario")
    begin
    EmailImpl.OpenInEditor(EmailMessage, EmailScenario, false);
    end;

    We can also send the email in the background by putting it on the scheduler using Enqueue procedure:

     /// <summary>
    /// Enqueues an email to be sent in the background.
    /// </summary>
    /// <param name="EmailMessage">The email message to use as payload.</param>
    /// <param name="EmailScenario">The scenario to use in order to determine the email account to use for sending the email.</param>
    procedure Enqueue(EmailMessage: Codeunit "Email Message"; EmailScenario: Enum "Email Scenario")
    begin
    EmailImpl.Enqueue(EmailMessage, EmailScenario);
    end;

    Attachments can be added to the email message using an InStream, something like this:

        procedure SendEmailWithAttachment(AttachmentTempBlob: Codeunit "Temp Blob")
       var
           Email: Codeunit Email;
           EmailMessage: Codeunit "Email Message";
           AttachmentInStream: InStream;
       begin
           EmailMessage.Create('dan@dankinsella.blog', 'My Subject', 'My message body text');
           AttachmentTempBlob.CreateInStream(AttachmentInStream);
           EmailMessage.AddAttachment('My Attachment name', 'PDF', AttachmentInStream);
           Email.Send(EmailMessage, Enum::"Email Scenario"::"Dan Test 2 DDK");
       end;
  • Create a relationship with multiple columns in Power BI

    Create a relationship with multiple columns in Power BI

    When building Power BI reports we often need to join two (or more) tables together, but what if the relationship is defined by two or more columns? Relationships in Power BI are limited to single columns, but whilst this seems like a major limitation there is actually a simple solution to create a relationship with multiple columns in Power BI.

    To create a relationship with multiple columns in Power BI we simply need to create a new column by merging the required columns together. What’s more, if we use the same name in both queries Power BI will automatically create the relationship for us.

    To do this, we open the Power Query Editor using the Transform Data button…

    Either from the Get Data Navigator when adding the data sources:

    Get Data Navigator

    or from the ribbon:

    Transform Data

    For my example I have two queries; Job_Planning_Lines and Job_Task_Lines, and I want to create a relationship between them using the two columns Job_No and Job_Task_No:

    Power Query Editor

    For each query we select the column we want to include, hold down the CTRL key after selecting the first:

    Power BI fields selected

    Note: the order in which you select the fields will determine the order the values are displayed in the new column.

    Now it’s decision time, do we want to create the new field and remove the original fields.. or do we want to keep the original fields? 

    To create the new key field and remove the original fields we select Merge Columns from the Transform tab:

    Transform - merge columns

    To create the new column but retain the original columns in our dataset we must use the Merge Columns button on the Add Column tab:

    Add Column - Merge Columns

    Once we’ve selected the appropriate Merge Column button, Power BI will ask for a delimiter and a name for this new column:

    merge columns

    You can choose to add a separator or not, I’ve chosen the colon character above and I’ve named the new column JobNoJobTaskNo. Remember to use the same setting in both queries.

    Once the new column has been created in both queries save the changes with the Close & Apply button on the Home tab:

    Close and Apply

    If we now view the data we can see the new column:

    view new merged column

    And the relationship has been automatically created by Power BI:

    table relationship

    Using the new column:

    manage table relationship

    That’s it!

  • Stop tracking files in Git with VS Code

    git

    Git provides a mechanism to ignore certain files in a repository, that’s the job of the .gitignore file. You can also stop tracking files in Git that have already been committed, but with a little bit more work.

    Simply create this file in the workspace root and list out all the files and directories that we don’t want Git to track.

    My .gitignore file will typically contain:

    .alpackages
    .vscode
    *.app

    A .gitignore file with the above contents will ignore both the .alpackages and .vscode folders, and any file with the extension .app.

    .alpackages – This contains the apps your app depends on and gets created when you download symbols.

    .vscode – This contains all your user specific workspace and environment settings such as launch.json, user workspace settings etc.. you don’t want to share this.

    *.app – this is you compiled app files and will be generated every time you compile.. this doesn’t belong in your repository.

    I’ll usually also have a scripts folder where I’ll put my PowerShell script to create my local Docker container, you may or may not want to share something like this in your repository. If not, add it to .gitignore.

    So far so good, but what if you or one of your team has already committed some files that shouldn’t be tracked? If Git is already tracking a file, adding it to .gitignore will do absolutely nothing.

    So how do we fix this?

    Simply deleting the files and committing wont resolve this as Git will continue to track the file. Once we put the file back (i.e. recreate the launch.json) Git will start tracking it again.

    We not only need to delete the files, we also need to remove the files from the Git index to stop tracking files in Git.

    The VS Code command pallet won’t help because the built in Git extension doesn’t have a command for this, so we’ll have to head over to our terminal and talk to Git directly.

    For an example, lets say no .gitignore file had been created for the initial commit and Git is now tracking every file in our repository. We want to create the .gitignore file shown above and stop tracking the directories and files specified in it.

    The command git rm can be used to remove tracked files from your repository index. To use this command on a directory, we need to add the recursive switch -r.

    From the VS Code terminal type the following commands:

    PS> git rm -r .alpackages
    PS> git rm -r .vscode
    PS> git rm *.app

    As we can see the command will accept the wildcard (*) and delete all .app files.

    At this point you can see that Git has staged all the file deletes:

    stop tracking files in Git

    Next up, create a file named .gitignore and add entries for the lines you want to ignore:

    gitignore

    Now stage the .gitignore file and commit your changes, before synchronizing with remote. The files will be removed from the remote, and any local repositories the next time they do a pull request. Of course, the files will still be visible in your git history if you ever need to recover anything.

    When you regenerate your launch.json (or paste is in from your backup) and download symbols, you’ll notice git is no longer tracking these files.

  • How-to: Create External POS Commands for LS Central

    POS Command

    In this blog post I show how-to create External POS Commands for LS Central, and introduce a snippet to make this task repeatable.

    External POS commands allow you to extend LS Central functionality by creating Codeunits that can be run via POS buttons or actions.

    Before you get started, you might want to find out how-to run LS Central in a Docker container.

    The high-level tasks are as follows:

    • Create a Codeunit to contain our new POS Command module.
    • Write the POS Command logic in a procedure.
    • Add code to register the module and POS command(s).
    • Register the new POS command module in LS Central.

    To view the POS commands within Business Central, open the POS Commands list:

    POS Command

    As we can see above, POS commands have a Function Code which is used to call the command and a field Function Type which can be either:

    • POS Internal – Don’t specify a codeunit, these are used internally (hard-coded) within LS Central
    • POS External – Allow you to specify a Codeunit to extend LS Central functionality

    We’re going to be focusing on External POS commands, which we can see from the filtered External POS Commands List:

    External POS Commands

    The listed POS Commands can be assigned to buttons on the POS, POS Actions or called directly in AL code.

    Create a POS Command Codeunit

    POS Command Codeunits follow a pattern:

    • Must have the TableNo property set to “POS Menu Line”.
    • OnRun() handles the registration event.
    • OnRun() handles command invocation with a case statement.

    The OnRun trigger of our Codeunit will need to handle one of two scenarios: either the Codeunit is being registered, or a command is being invoked:

    To register our new module and external POS command we need to make use of the “POS Command Registration” Codeunit, which contains two procedures we’ll need:

    • RegisterModule – used to store the module information:
      • Module – A code for your Codeunit Module (Code[20]).
      • Description – A description of the module (Text[50]).
      • Codeunit – The Codeunit Object Id being registered.
    • RegisterExtCommand – used to register each of the commands in our module:
      • FunctionCode – A code for the POS Command being registered (Code[20]).
      • Description – A description of the POS command (Text[50]).
      • Codeunit – The Object Id of the Codeunit containing the POS command.
      • ParameterType – The parameter data type, an option field on the POS Command table. 0 for no parameter.
      • Module – The code of the module the POS command belongs to.
      • BackGrFading – Boolean to fade the POS background when this command runs.

    When a POS command is being requested, the OnRun() trigger is invoked with the “POS Menu Line” record’s Command field holding the FunctionCode of our POS command. We use a case statement to determine which (if any) procedure within our Codeunit to run:

    As a personal preference, I like to encapsulate the FunctionCode for each POS command and the Module code value in procedures:

    It’s good practice not to enter literal text values into code generally, but I also find it useful to be able to retrieve these codes in certain circumstances. Note I’ve added the locked parameter to the Label constants, this is to stop the code value being translated. The code should stay the same for consistency, whatever the language used.

    Register the POS Command

    Before we can use our new POS command module we’ll need to register it within LS Central. This is done from the External POS Commands page:

    Register POS Command

    Filter to our new Codeunit and hit OK:

    Select POS Command Codeunit

    Check our new POS command is registered:

    Registered POS command

    Note: Every time you add a new POS command to your module Codeunit you’ll need to re-register.

    Get the full demo Codeunit on GitHub.

    Get the Visual Studio Code snippet here.

  • AL Page: show integer or decimal as mandatory


    A quick tip, as it’s been a while since my last post..

    The ShowMandatory property for fields on a page object is helpful for drawing the user’s attention to required fields on a page.

    If a field is not populated on a page and the ShowMandatory property for that field is set to true, then a red asterisk (*) will appear:

    Mandatory Decimal

    The problem is, for number based fields which default to 0, this field is actually populated so the asterisk will not show up.

    Luckily there is an easy solution; to show integer or decimal fields as mandatory we can also set the field’s BlankZero field to true:

    pageextension 50000 "Item Card DK" extends "Item Card"
    {
        layout
        {
            modify("Net Weight")
            {
                BlankZero = true;
                ShowMandatory = true;
            }
    }
    If you have more complex (or fringe) requirements, such as numbers must be positive, there is also the BlankNumbers page field property. BlankNumbers can be set to the following values:
    Value Description
    DontBlank (default) Not clear any numbers
    BlankNeg Clear negative numbers
    BlankNegAndZero Clear negative numbers and zero
    BlankZero Clear numbers equal to zero
    BlankZeroAndPos Clear positive numbers and zero
    BlankPos Clear positive numbers

    Note: BlankNumbers is not available when modifying fields from a pageextension object, you can only use this property on a  field declaration.

  • Programming Lookup and Numpad controls for LS Central Web POS

    Programming lookups and numpads for LS Central Web POS

    If you’ve been used to working with LS Central Windows POS you my find a bit of a surprise when upgrading your existing solution or programming lookups and numpads for LS Central Web POS

    Programming lookups and numpads for LS Central Web POS

    LS have implemented the POS user interface with client add-in components embedded within a Business Central page.

    The fundamental difference between the Web and Windows POS is in the interaction between Business Central and the LS client add-in components:

    • LS Windows POS – Uses .NET add-in components which behave synchronously.
    • LS Web POS – Uses JavaScript client add-in components which behave asynchronously.

    So what does this mean for my AL code?

    Synchronous behavior means you can invoke the Numpad or Lookup control and get the result as a return value. Nice and simple in terms of AL code:

    if OpenNumericKeyboard(DepositTxt, '', ValueTxt, false) then
      Evaluate(Amount, ValueTxt);


    With the LS Web POS, the asynchronous behavior of the JavaScript add-in components requires a bit more work; You must first invoke the control, then wait for an event which will contain the result.

    The event you need to subscribe to will vary depending on the control you’ll be using, but you’ll find the relevant events in Codeunit “EPOS Controler” (LS spelling, not mine!), for example:

    • OnKeyboardResult
    • OnLookupResult
    • OnNumpadResult

    OK, so lets look at an example.

    Programming a Numpad control

    So the steps are as follows:

    • Open the numeric keyboard control
    • Subscribe to the OnNumpadResult event to get response
    • Process the response, if the result is for you

    Open the NumericKeyboard

    To invoke the number pad control we use the OpenNumericKeyboardEx() procedure from Codeunit 10012732 “EPOS Control Interface HTML”, which has the following parameters:

    • Caption: The title of the number pad control. Should be instructional to the user.
    • DefaultValue: If required, you can pre-populate the value on the popup using this parameter.. or leave blank
    • Result: Not used
    • payload: An identifier we can use when deciding if to handle the OnNumpadResult() event, for instance we could use the POS Command code.
        local procedure RecordFootfall()
        var
            EPOSControl: Codeunit "EPOS Control Interface HTML";
            EnterFootfallLbl: Label 'Enter store footfall';
            Result: Action;
        begin
            EPOSControl.OpenNumericKeyboardEx(EnterFootfallLbl, '', Result, RecordFootfallCommand());
        end;

    Subscribe to the OnNumPadResult() event

    Once we’ve opened the numeric keyboard control, well need to wait to pick up the result via an event. We subscribe to the OnNumpadResult() event in Codeunit 10012718 “EPOS Controler”, and test the raised event is the one we’re interested in using the payload parameter:

        [EventSubscriber(ObjectType::Codeunit, Codeunit::"EPOS Controler", 'OnNumpadResult', '', false, false)]
        local procedure OnNumpadResult(payload: Text; inputValue: Text; resultOK: Boolean; VAR processed: Boolean)
        begin
            case payload of
                RecordFootfallCommand():
                    HandleFootfall(inputValue, resultOK, processed);
            end;
        end;

    Process the result

    The processed parameter needs to be set to true to stop LS from trying to continue and process this result. It will actually error in our case as at some point it will try and evaluate the payload to an integer.. in usual LS error handling finesse…

    We can use the resultOK parameter to check if the user pressed the OK button. As the return value is a Text variable we’ll have to evaluate this to a Decimal to get the format we require.

        local procedure HandleFootfall(FootfallAmountTxt: Text; ResultOk: Boolean; var Processed: Boolean)
        var
            Footfall: Decimal;
            DataTypeErr: Label 'Footfall amount must be a decimal value.';
        begin
            Processed := true;
            if not ResultOk then
                exit;
            if FootfallAmountTxt = '' then
                exit;
            if not Evaluate(Footfall, FootfallAmountTxt) then
                error(DataTypeErr);
        end;
    That’s it, thanks for reading.
  • Removing Business Central Docker containers with PowerShell

    Removing Business Central Docker containers with PowerShell

    Yesterday I bumped into an intermittent issue on our Jenkins CI server where some Business Central containers where not getting removed after use. This led me to find a way of removing Business Central Docker containers with PowerShell, and a topic for a blog post. The issue seems to be with a process keeping the NavContainerHelper container folder open, which is stopping the script from removing it.. anyway, that’s not what this post is about.

    As a temporary work-around while I get to the root cause of the issue, I decided to build the containers with a unique name and setup a nightly cleanup job to remove any surplus containers on the build server.

    To do this, I first need a list of containers to remove. I used the docker ps command, formatting the result a a table to make it easier to use in PowerShell:

    $containers = docker ps -a --filter "name=bc*" --format "{{.Names}}"

    Filtering

    I was using the prefix “bc” on my container names, so I’ve selected this as my filter “name=bc*”. You could also filter on the image using the ancestor filter. For example:

    $containers = docker ps -a --filter "ancestor=mcr.microsoft.com/businesscentral/sandbox:gb-ltsc2019"

    Unfortunately I couldn’t get the ancestor filter to work with a more generic image name (i.e. mcr.microsoft.com/businesscentral/sandbox) which limited it’s usefulness in my scenario.

    There is also the label filter which is useful. The Business Central images come with a number of labels which we can retrieve by querying our containers. For example:

    PS C:\WINDOWS\system32> docker ps -a --format "{{.Labels}}"
    country=gb,tag=0.0.9.97,nav=,osversion=10.0.17763.914,platform=15.0.37865.39262,created=201912201932,cu=update31,eula=https://go.microsoft.com/fwlink/?linkid=86
    1843,legal=http://go.microsoft.com/fwlink/?LinkId=837447,maintainer=Dynamics SMB,version=15.1.37881.39313
    country=W1,legal=http://go.microsoft.com/fwlink/?LinkId=826604,maintainer=Dynamics SMB,nav=2018,tag=0.0.9.2,version=11.0.19394.0,created=201903101911,cu=rtm,eul
    a=https://go.microsoft.com/fwlink/?linkid=861843,osversion=10.0.17763.316
    cu=rtm,eula=https://go.microsoft.com/fwlink/?linkid=861843,legal=http://go.microsoft.com/fwlink/?LinkId=826604,maintainer=Dynamics SMB,nav=2018,country=gb,creat
    ed=201903102009,osversion=10.0.17763.316,tag=0.0.9.2,version=11.0.19394.0

    The above output shows a list of label key/value pairs being used by containers on my machine (I’ve only got Business Central and NAV containers). One label common to all my containers is “maintainer=Dynamics SMB”, which we could use in our filtering as follows:

    docker ps -a --filter "label=maintainer=Dynamics SMB"

    Formatting the output

    After running the script (with –format “{{.Names}}”), $containers will look something like this:

    bccontainer1
    bccontainer2
    bccontainer3

    I only want the container name so I’m only requesting this one field in the format parameter. If I wanted more information I could simply list out the additional fields required. For example:

    $containers = docker ps -a --format "{{.Names}} {{.ID}} {{.Image}}"

    With my list of container names I can now loop through and invoke the Remove-NavContainer Cmdlet on each name:

    $containers = docker ps -a --filter "name=c*" --format "table {{.Names}}"
    
    foreach ($container in $containers) {
        Write-Host 'Removing ' $container
        try {
          Remove-NavContainer -containerName $container
        }
        catch {
          Write-Host 'Could not remove ' $container -f Red
        }
    }

    As I still had problems with the NavContainerHelper folder being locked, the script was still failing on some containers (Jenkins restart required) so I added a try-catch to make sure the script at least attempts to remove all containers.

    That’s it, dirty hack temporary fix complete!