Ever tried to uninstall a Business Central app in PowerShell, and failed due to dependencies on that app? I hit that problem and decided to share a script to detect and uninstall all dependant apps.
I was looking to publish an app from VS Code on a copy of a customers database so I could debug and develop locally and needed to uninstall the app first before I could deploy. The problem was, this app was a dependency for several other apps created for the customer.
What I found is we can get a full list of apps installed with the Get-NavAppInfo cmdlet, then for each app iterate through the dependencies until we find our app:
Yesterday I bumped into an intermittent issue on our Jenkins CI server where some Business Central containers where not getting removed after use. This led me to find a way of removing Business Central Docker containers with PowerShell, and a topic for a blog post. The issue seems to be with a process keeping the NavContainerHelper container folder open, which is stopping the script from removing it.. anyway, that’s not what this post is about.
As a temporary work-around while I get to the root cause of the issue, I decided to build the containers with a unique name and setup a nightly cleanup job to remove any surplus containers on the build server.
To do this, I first need a list of containers to remove. I used the docker ps command, formatting the result a a table to make it easier to use in PowerShell:
$containers = docker ps -a --filter "name=bc*" --format "{{.Names}}"
Filtering
I was using the prefix “bc” on my container names, so I’ve selected this as my filter “name=bc*”. You could also filter on the image using the ancestor filter. For example:
$containers = docker ps -a --filter "ancestor=mcr.microsoft.com/businesscentral/sandbox:gb-ltsc2019"
Unfortunately I couldn’t get the ancestor filter to work with a more generic image name (i.e. mcr.microsoft.com/businesscentral/sandbox) which limited it’s usefulness in my scenario.
There is also the label filter which is useful. The Business Central images come with a number of labels which we can retrieve by querying our containers. For example:
The above output shows a list of label key/value pairs being used by containers on my machine (I’ve only got Business Central and NAV containers). One label common to all my containers is “maintainer=Dynamics SMB”, which we could use in our filtering as follows:
docker ps -a --filter "label=maintainer=Dynamics SMB"
Formatting the output
After running the script (with –format “{{.Names}}”), $containers will look something like this:
bccontainer1
bccontainer2
bccontainer3
I only want the container name so I’m only requesting this one field in the format parameter. If I wanted more information I could simply list out the additional fields required. For example:
$containers = docker ps -a --format "{{.Names}} {{.ID}} {{.Image}}"
With my list of container names I can now loop through and invoke the Remove-NavContainer Cmdlet on each name:
$containers = docker ps -a --filter "name=c*" --format "table {{.Names}}"

foreach ($container in $containers) {
    Write-Host 'Removing ' $container
    try {
      Remove-NavContainer -containerName $container
    }
    catch {
      Write-Host 'Could not remove ' $container -f Red
    }
}
As I still had problems with the NavContainerHelper folder being locked, the script was still failing on some containers (Jenkins restart required) so I added a try-catch to make sure the script at least attempts to remove all containers.
In my previous blog post How-to: Run LS Central in a Docker container I showed how you can run LS Central on Docker with some manual steps to get the client and server components installed.
For this blog post I’m going to show a more reusable solution where you can install the client components via a script passed into the container.
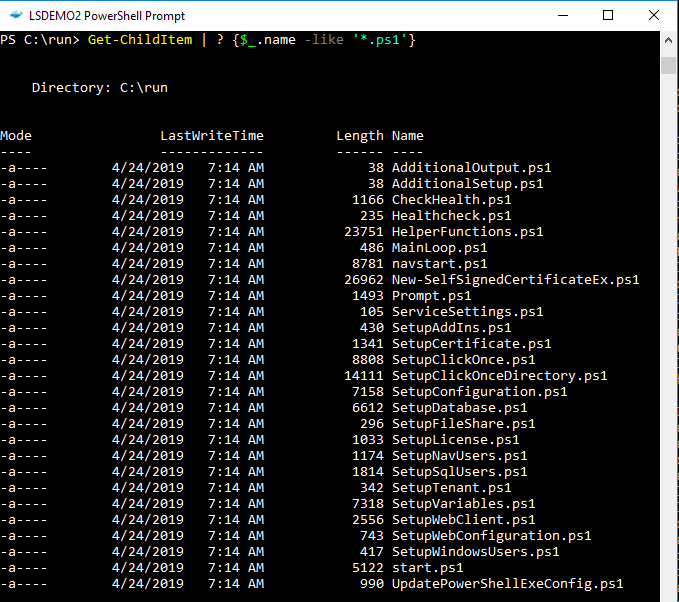
To make the Business Central Docker images configurable, the designers decided to incorporate a set of Powershell script files which can be substituted at build time to override the standard setup process. The standard scripts are found in the containers C:\Run directory:
The AdditionalSetup.ps1 script file, which is empty by default, when overwritten will execute after the main setup has completed. This is where we can provide code to install additional components such as client and service add-ins.
When you place a script with the same name into the containers C:\Run\my directory, Docker will use this version of the file instead of the standard version. As we saw in my previous blog post the New-NavContainer Cmdlet’s -myScripts parameter is used to copy files from the Docker host into the containers C:\Run\my directory.
I’ve created an AdditionalSetup.ps1 file with the following content:
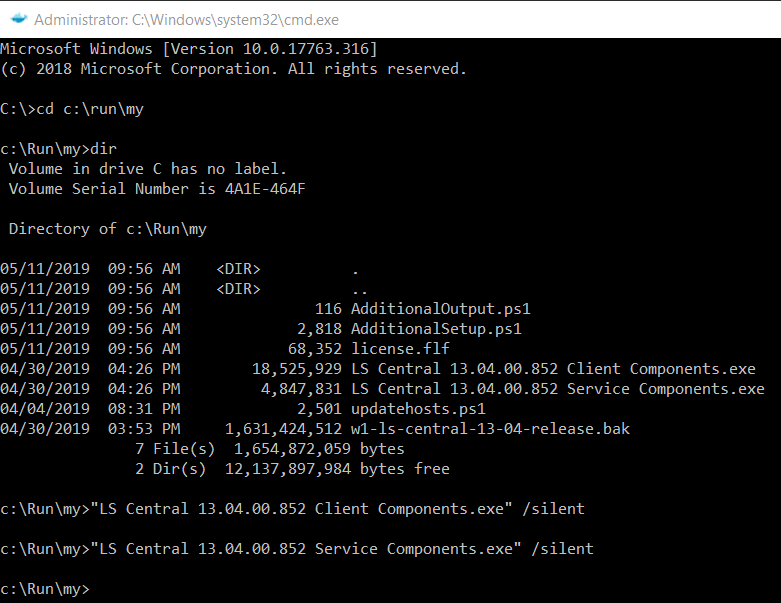
Write-Host "Installing LS Client Components.."

& "C:\Run\my\LS Central 13.04.00.852 Client Components.exe" /silent

Write-Host "Installing LS Service Components.."

& "C:\Run\my\LS Central 13.04.00.852 Service Components.exe" /silent

Write-Host "Remove database backup.."

Remove-Item -Path 'C:\Run\my\*' -Include *.bak
Note: The reason I’m not cleaning up the installer files is because I was getting an access denied error. If anyone knows why I can delete the database backup but not the .exe files please let me know in the comments!
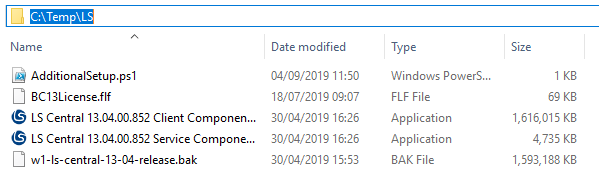
For this example I’ve created a folder on the Docker host machine with the following content:
Now I can run a script to build the container, using my setup files and additional setup script:
Microsoft have been releasing Business Central (formerly Dynamics NAV) as Docker images for a few years now. These have been great for testing and learning the new developer tools and trying out new functionality, but in real life many of us don’t use vanilla Business Central. You, like me, probably need an ISV solution and it’s demo data before Docker is useful on customer projects and demos.
This blog post shows one way you can get LS Central by LS Retail running in a Docker container.
LS Central releases contain a demo .bak file which we’ll use to replace the default .bak file that comes with Business Central. We’ll also need the client and server add-in files to deploy to the container.
Note it’s important that any installer packages can run in unattended/silent mode as Windows Server Core based containers do not have a GUI to handle any user interaction. One way to check this is to run the .exe with the /? parameter and see if it prints out any information. LS Central installers use the /silent parameter:
PS C:\Temp\LS> & '.\LS Central 13.04.00.852 Client Components.exe' /?

---------------------------
Setup
---------------------------
The Setup program accepts optional command line parameters.


/HELP, /?

Shows this information.

/SP-

Disables the This will install... Do you wish to continue? prompt at the beginning of Setup.

/SILENT, /VERYSILENT

Instructs Setup to be silent or very silent.

/SUPPRESSMSGBOXES

Instructs Setup to suppress message boxes.

/LOG

Causes Setup to create a log file in the user's TEMP directory.

/LOG="filename"

Same as /LOG, except it allows you to specify a fixed path/filename to use for the log file.

/NOCANCEL

Prevents the user from cancelling during the installation process.

/NORESTART

Prevents Setup from restarting the system following a successful installation, or after a Preparing to Install failure that requests a restart.

/RESTARTEXITCODE=exit code

Specifies a custom exit code that Setup is to return when the system needs to be restarted.

/CLOSEAPPLICATIONS

Instructs Setup to close applications using files that need to be updated.

/NOCLOSEAPPLICATIONS

Prevents Setup from closing applications using files that need to be updated.

/RESTARTAPPLICATIONS

Instructs Setup to restart applications.

/NORESTARTAPPLICATIONS

Prevents Setup from restarting applications.

/LOADINF="filename"

Instructs Setup to load the settings from the specified file after having checked the command line.

/SAVEINF="filename"

Instructs Setup to save installation settings to the specified file.

/LANG=language

Specifies the internal name of the language to use.

/DIR="x:\dirname"

Overrides the default directory name.

/GROUP="folder name"

Overrides the default folder name.

/NOICONS

Instructs Setup to initially check the Don't create a Start Menu folder check box.

/TYPE=type name

Overrides the default setup type.

/COMPONENTS="comma separated list of component names"

Overrides the default component settings.

/TASKS="comma separated list of task names"

Specifies a list of tasks that should be initially selected.

/MERGETASKS="comma separated list of task names"

Like the /TASKS parameter, except the specified tasks will be merged with the set of tasks that would have otherwise been selected by default.

/PASSWORD=password

Specifies the password to use.


For more detailed information, please visit http://www.jrsoftware.org/ishelp/index.php?topic=setupcmdline
---------------------------
OK
---------------------------
Of course if the installer is only adding DLLs to the add-ins folder then you could also get these files from another machine and copy them into the container. Have a look at the docker cp command documentation to see how to copy files into a container.
We’re going to use the Create-NavContainer Cmdlet from the NavContainerHelper PowerShell module to build the container and use the LS demo database. We can use the -myScripts parameter to copy the LS components into the container, and then install them individually using the shell desktop shortcut the NavContainerHelper module creates.
I used a script from Freddy’s Blog and adapted to suit. The steps look like this, adjust as required:
In the above PowerShell script which I ran from PowerShell ISE, I copy the demo database and LS component installers into the containers C:\run\my directory using the -myScripts parameter, and then replace the database used during installation using the -additionalParameters parameter.
Note: you must match the correct Business Central image for your demo database. LS Central 13.04 is based on Business Central On-prem CU3, check the release notes for the version you need and adjust he image name in the script above.
So far so good, we have a running container but if we try and use the system we’ll quickly bump into a missing component error. Next we’ll need to install the LS components.
The NavContainerHelper Module has conveniently left a command line shortcut on my desktop:
We can use this to install our LS components which we loaded into the container c:\Run\my directory earlier:
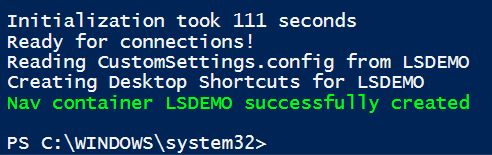
We now have LS Central running in our Docker container.
If you want to use the LS Windows Client POS you’ll also need to copy the LS client components into local RTC add-ins folder created by NavContainerHelper. Assuming the container name is LSDEMO, the local add-in folder can be found on the Docker host machine here:
When you start looking into build automation, one of the first things you’ll need to figure out is how to build an AL project without Visual Studio Code. This blog post serves as a brief introduction to finding the AL compiler and how to run it from the command line.
Where to find the AL compiler
The Business Central AL compiler is shipped inside the AL Language extension (vsix) file. The easiest way I find to get the correct compiler version is to create a docker container using the Business Central image version required and extract the VSIX file. The container will provide a HTTP download link to the AL Languageextension, but I prefer to copy the VSIX file to the local file system from the containers C:\Run directory using the docker cp command.
The VSIX file is essentially a zip archive, so with 7zip installed I can extract the contents of the AL Language vsix file as-is, but you can also change the file extension to zip so the built in Windows zip tool can recognise the file. Of course we’ll want to script all this for automation, so as an example the following PowerShell can be used:
The Expand-Archive Cmdlet requires the zip extension, so I first copy the vsix file and give the new file the zip extension.
Once the archive has been extracted you can find the AL compiler (alc.exe) in the \extension\bin directory:
AL compiler (alc.exe)
Run the AL compiler from the command line
If we run the alc.exe application with the /? parameter, the parameters supported by the AL compiler are printed to the screen:
Microsoft (R) AL Compiler version 2.1.1.13845
Copyright (C) Microsoft Corporation. All rights reserved

AL Compiler Options

- PROJECT DIRECTORY -
/project: Specify the project directory.

- OUTPUT FILE -
/out: Specify the output package file name (default: the name is generated from the project manifest as __.app).

- ERRORS AND WARNINGS -
/warnaserror[+|-] Report all warnings as errors.
/nowarn: Turn off specific warning messages.
/errorlog: Specify a file to log all compiler and analyzer diagnostics.
/ruleset: Specify a ruleset file that alters severity of specific diagnostics.

- SETTINGS -
/packagecachepath: Specify the cache location for the symbols.
/target: Specify the compilation target.
/features: List of feature flags.

- MISCELLANEOUS -
/parallel[+|-] Concurrent build. (Short form /p[+|-])
The minimum required parameters are:
/project – to specify the AL project workspace root.
/packagecachepath – to specify the location of the symbol files and any dependent app files.
If successful the built app file will be placed in the workspace root folder. Error and warning messages will be displayed in the console output.
How-to get the symbol app files?
So far so good, but if you you want to introduce build automation you’ll need a way of getting the latest symbol files for the compiler to reference.
When using Visual Studio Code to build projects, you’ve probably noticed that the symbol files are downloaded from the Business Central service’s developer end-point. We can achieve the same result programmatically using the PowerShell Cmdlet Invoke-WebRequest.
The following script serves as an example (the credential code came from here):
As an aside, the version I’ve used above for the versionText parameter (13.0.0.0) is now outdated as the Business Central April release is versioned 14, however, using version 13.0.0.0 still currently appears to download the correct symbols even on the April ’19 release.
If you have access to an account with local administrator privileges to a Windows box hosting the Dynamics NAV or Business Central service, you can add your own user very easily with Powershell.
Note: This post is about the on-premise version of Business Central (formerly Dynamics NAV), to add a user to Business Central Cloud/SaaS see here: Add User in Business Central Cloud / SaaS
This functionality has been available for quite sometime in Dynamics NAV and continues to be applicable to Business Central On-premise… so it surprises me how often I get asked for a NAV user by technical staff. I’ll now be forwarding this blog post when asked!
Another use for this of course (amongst other things) is when you need to restore a database which doesn’t contain a login you have access to. In the past we had to clear out the User related tables in SQL so NAV would give us access on first log on.
As of Business Central CU03, the Cmdlets still have “NAV” in their name.
So for example, using the Business Central or Dynamics NAV Administration Shell (run as administrator) we can add a new Windows user to NAV/BC and assign the SUPER Permission Set as follows:
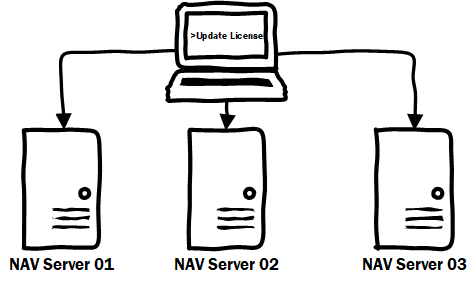
To update Dynamics NAV licenses of multiple databases used to be a bit of a headache. We have customers running independent NAV instances in the hundreds using LS Retail POS. Imagine having to log into each machine manually:
Connect to the remote host.
Upload the Dynamics NAV license file to the remote host.
Import the license file.
Restart the Dynamics NAV Service Tiers.
Maybe you have multiple development / test machines which need a yearly license update?
In this blog post I demonstrate how you can update NAV licenses on multiple remote hosts all from the comfort of your own PowerShell prompt. Hopefully, along the way you’ll pick up some PowerShell tricks to make your life easier!
Update Dynamics NAV License Centrally on Multiple NAV Servers
Before we get started there are a few prerequisites to this technique:
The remote hosts are on the same domain.
The user account running the PowerShell script has local admin on the host.
Connecting to a remote host with PowerShell
PowerShell comes with a utility called PowerShell Remoting. This allows us to connect to remote servers which have PowerShell Remoting enabled. Windows Server 2012 R2 and above have PowerShell Remoting enabled by default, but if we need to enable this manually we can run the following command on the host:
> Enable-PSRemoting -force
If the -force option is not used a prompt asking if we want to continue will occur.
A password prompt will appear if we specify a user account.
The Enter-PSSession cmdlet is handy when we want to enter into an interactive session with a remote host, but it will come up short when we want to start automating our scripts.
New-PSSession is used to create a PowerShell session. This session can be a remote session and we can assign this session to a variable. This session variable can be used with the Invoke-Command cmdlet.
For example, we could create a remote session and get a list of services on the remote host with:
In a scenario where we have a list of remote hosts to process, we will likely want to keep a note of any hosts that fail to respond. A simple method is to write any failures out to a text file. We can catch these failures in a try / catch block:
The Add-Content cmdlet will append values to the end of the file specified, creating the file if it doesn’t exist.
Send the local NAV license file to the host machine
I thought about a few options for getting the license file on the host machine:
Put the license file on a web server or fileshare and download from the host.
Copy the file through the Copy-Item Cmdlet using the -FromSession parameter.
But the most convenient in this scenario is to put the license data in a byte array and pass it into the Import-NAVServerLicense Cmdlet using the -LicenseData parameter.
To create a byte array from the NAV license file we can use the following code:
$LicenseData now contains the new NAV license, but we’ve created this variable in our local PowerShell session. Once we’ve created the remote session we will need to pass this variable in to the script block we are going to execute in the remote session. To do this, we can utilise script block parameters:
You may have noticed the -ArgumentList value looks a bit weird: (,$LicenseData). This is because the -ArgumentList parameter expects an array value, and will pass our byte array through as individual elements. That said, I’ve no idea why this syntax works… Stack Overflow to the rescue!
If you don’t use the (,$ArrayVar) syntax, expect an error message like this:
So far we can create a remote session, move the license data to the remote host and execute script block on the remote host. Next we need to import the license into the remote Dynamics NAV instance. This is done using the Import-NAVServerLicense cmdlet:
> Import-NAVServerLicense <NAV Service Instance> -LicenseData <License Data>
The minimum parameters we need are the Dynamics NAV service instance name and the license data. We’ve already got the license data in the $LicenseData byte array, so lets look at getting a service to use.
To make this simple, I’m going to apply the license to any running services on the host. I’ve blogged about getting running services previously, here’s some PowerShell to return the service names of any running NAV services:
The following script will get a list of running Dynamics NAV services, apply the license using the first service found and then restart all Dynamics NAV services:
# Put license data in Byte array
[Byte[]]$LicenseData = Get-Content -Path "C:\Temp\License.flf" -Encoding Byte

# Get list of running NAV services
$NAVServices = Get-NAVServerInstance | Where-Object {$_.State -eq 'running'} | Select-Object -ExpandProperty "ServerInstance"

# If variable is an array get the first index
If ($NAVServices -is [array]) {
 $NAVService = $NAVServices[0]
} else {
 $NAVService = $NAVServices
}

# Check we have a NAV service before we try to import a license
if (-Not [string]::IsNullOrEmpty($NAVService)) {
 Import-NAVServerLicense $NAVService -LicenseData $LicenseData
}

# Restart the service(s)
Restart-Service -Name $NAVServices
Putting it all together: Update Dynamics NAV Licenses on remote machines
OK, we’ve run through all the parts. Lets put this all in to one script:
# Array of host machines
$RemoteHosts = "NAVSERV01", "NAVSERV02", "NAVSERV03"

# Text file with list of host machines
# $RemoteHosts = Get-Content -Path "C:\Temp\NAVHostsList.txt"

[Byte[]]$LicenseData = Get-Content -Path "C:\Temp\License.flf" -Encoding Byte

$ScriptBlock = {
 param ($LicenseData)

 Import-Module 'C:\Program Files\Microsoft Dynamics NAV\110\Service\NAVAdminTool.ps1'

 $NAVServices = Get-NAVServerInstance | Where-Object {$_.state -eq 'running'} | Select-Object -ExpandProperty "ServerInstance"

 # If variable is an array get the first index
 If ($NAVServices -is [array]) {
   $NAVService = $NAVServices[0]
 } else {
   $NAVService = $NAVServices
 }

# Check we have a NAV service before we try to import a license
 if (-Not [string]::IsNullOrEmpty($NAVService)) {
   Import-NAVServerLicense $NAVService -LicenseData $LicenseData

  # Restart the service(s)
   Restart-Service -Name $NAVServices
 }
}
foreach ($RemoteHost in $RemoteHosts) {
 try {
   $session = New-PSSession -Computer $RemoteHost

   Invoke-Command -Session $session -ScriptBlock $ScriptBlock -ArgumentList (,$LicenseData)

 } catch {
   Add-Content -Path "C:\Temp\ErrorLog.txt" -Value ("Error updating license on: " + $RemoteHost)
 }
}
Whilst this does the job, there is plenty of room for improvement. Error handling is very lightweight for a start. Issues connecting to a remote host will be logged in the ErrorLog file, but if any errors occur in the remote session you’ll only be able to view them from the console output. Also, this script only allows for a single version of NAV and assumes all services on a remote host are connected to the same database.
So, feel free to use and adapt this script.. but do so at your own risk.
Update: Since Docker 1.13 (API version 1.25) the prune command has been available. You can remove all unused images with > docker image prune –all
If like me, you’ve been experimenting with Docker since Microsoft made the Dynamics NAV images available, you’ll probably notice you’re using up a fair bit of hard drive space. So how do we remove Docker Images?
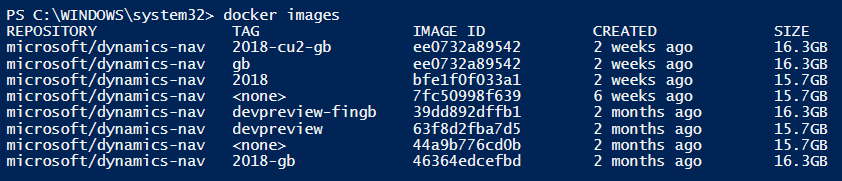
Dynamics NAV Docker Images
The image above is a tad misleading however, as Docker shares images saving space. The microsoft/windowsservercore image for example is around 10GB, and is reused by all the other Dynamics NAV images. The size you see in the screenshot above is the total size of the image if you were to save an archive using the docker save command. Still, my Docker folder was somewhere around 40-50GB in size.
So today I decided to have a clean up and remove all the images from my machine. I could have removed each image one by one using docker rmi:
Docker tip: When referencing Docker Image or Containers in Docker commands, for brevity, you can use the first x number of characters of the Image or Container ID. Where x is the minimum number needed to identify a unique ID on your system. The first three characters will be fine in most cases.
But.. repetition is a computers job right?
To automate this we’ll need to get a list of our Docker Image IDs and pass them to the docker rmi command.
To get a list of Image IDs on our system, we can use the docker images command with the -q option:
Get Docker Image IDs
We can then take the list of image IDs and iterate through them using a PowerShell foreach statement:
So far so good.. we can remove Docker images with a PowerShell script. But what if we want to keep the base image? It’s around 12GB, so we probably don’t want to download it again next time we pull a NAV image.
The docker images command takes the repository name as an optional parameter. We can use this to filter on our NAV images:
> docker images microsoft/dynamcis-nav
List NAV Docker Images
Keeping the base image
The problem is, unless we’ve explicitly requested the base image it doesn’t show up in our image list. This means it will get removed with the last NAV image referencing it. To get around this we just need to do a pull request for the base image.
To understand this concept, it’s important to know that Docker images are built in layers. Instead of building an entire image from scratch every time, when creating an image you can base it on an existing image. All Dynamics NAV images are built on an image called microsoft/nav-docker. Docker images can be built from a Dockerfile. We can view the Dockerfile for microsoft/nav-docker and see that this image is currently based on the microsoft/dotnet-framework:4.7-windowsservercore image.
So back to the pull request:
> docker pull microsoft/nav-docker
Cant Pull nav-docker Image
Microsoft has restricted access, or just not published this image. We can use the image that microsoft/nav-docker is based on instead:
Running this command didn’t download the image again as Docker found it locally. However, it will now list the microsoft/dotnet-framework:4.7-windowsservercore image alongside our NAV images:
Docker Images with a base image available
As we can see from the size attributes, the 4.7-windowsservercore image makes up the bulk of the NAV image size.
To remove all the microsoft/dynamics-nav images but leave the microsoft/dotnet-framework image for later use, we can run the following PowerShell script:
To have a look at another filtering option lets explore another scenario. What if we want to keep the most recently pulled NAV image, but remove Docker images previous to this?
The docker images command has a –filter option. We can use this to filter on the image created date. It’s important to note that this is based on the time the images were created on your system (when it was pulled), not when the vendor created or published the image.
Using a before filter we can get a list of all image IDs that where pulled before microsoft/dynamics-nav:latest:
So far we’ve used a foreach loop to iterate through the list of image IDs we get back from the docker images command. I think this approach makes the script easier to read, but we can also use this list directly with the docker rmi command on the same line:
In this blog post I explain how you can restart Dynamics NAV services with Powershell, while also exploring a few of the available Cmdlets for selecting services and properties.
Restarting a NAV service
Restart-Service is a standard Powershell Cmdlet that will stop and then start Windows services. If the service is already stopped, then it will simply start the service.
Restarting the default NAV 2017 service can be done as follows:
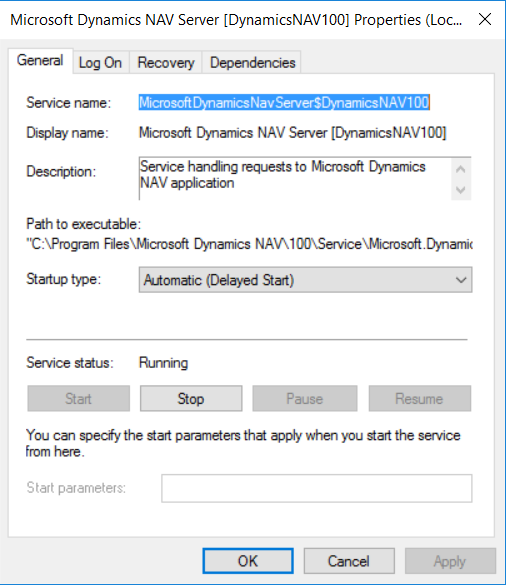
The unnamed parameter ‘MicrosoftDynamicsNavServer$DynamicsNAV100’ is the service name, this is always the Dynamics NAV Server instance name prefixed with MicrosoftDynamicsNavServer$.
The properties of the default NAV 2017 service
Restarting multiple NAV services
Restarting multiple services can be done simply by using the * wildcard in the service name parameter:
The above command will restart every service with a name beginning with MicrosoftDynamicsNavServer.
So far the services selected for restart have been very indiscriminate, we’ve simply restarted all NAV services on the machine… What if we need to be a bit more selective?
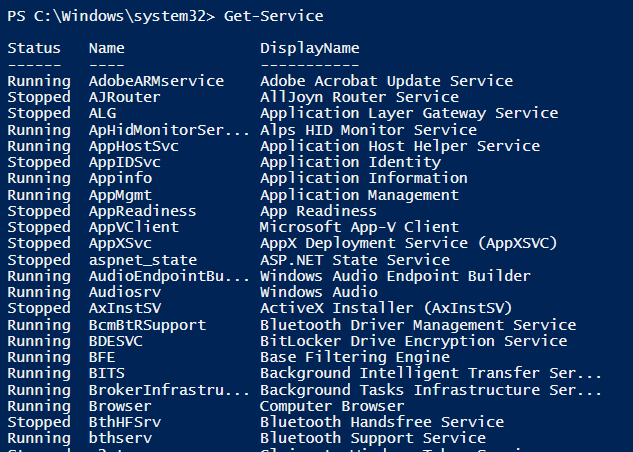
Get-Service provides us with the ability to get objects representing Windows services. To get all services on your machine run Get-Service with no parameters:
PS C:\Windows\System32>Get-Service
The above command will print out a list of services and there statuses:
Output of the Get-Service Cmdlet
The same wildcard used for the Restart-Service Cmdlet can be used with Get-Service using the -Name parameter:
Get running NAV services with Get-Service and Where-Object
The output of Where-Object can be piped into Restart-Service.. so by piping Get-Service into Where-Object into Restart-Service, we can now restart all currently running NAV services with the following:
As always, there are many ways to skin a cat.. We could also approach this problem from another direction. The Get-NavServerInstance Cmdlet is available in the NavAdminTool.ps1 script file found in the NAV service folder. The script file will need to be loaded into your Powershell environement using the Import-Module Cmdlet:
You can change the execution policy using the Execution-Policy Cmdlet. In the following image you can see that I get the current execution policy for reference and then after changing the execution policy, I am able to run the Import-Module Cmdlet:
Powershell change execution policy
For security reasons it’s good practice to change the execution policy back:
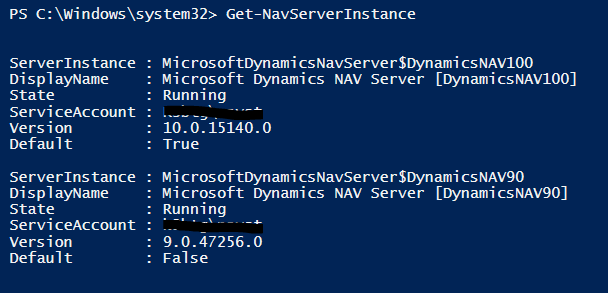
Get-NavServerInstance returns a list of NAV services, but the output is not compatable with the Restart-Service Cmdlet:
Output of Get-NavServerInstance
We can however pipe the output into the Select-Object Cmdlet which we can use to get the service names as string objects: PS C:\Windows\system32> Get-NavServerInstance | Select-Object -ExpandProperty "ServerInstance"
Get-NavServerInstance ServerInstance Property
The string objects can then be piped directly into the Restart-Service Cmdlet: